Showing posts with label vegetarian. Show all posts

Monday, March 7, 2011

Double Kale Quinoa Pesto

Let me set the scene:

It's Sunday.

I know that dinner won't make itself.

I know that if Jay makes dinner we'll be eating Target brand pizza.

I know that Jay's diet on Saturday consisted of Taco Bell for lunch and McDonalds for dinner.

Knowing all this it sounded like the perfect day to make the most vegetable-centric dish I could find. The boy was due for some greens.

Enter... Double Kale Quinoa Pesto, also known as the Fast Food Detox.

Quinoa is a great grain for vegetarians because it is a complete protein, meaning that it contains all 9 essential amino acids (an anomaly of vegetarian protein sources).

The addition of a leafy green like kale (known for its wealth of Vitamin K, of which each cup contains 1327% of the RDV) really kicks up the healthfulness of this recipe.

In fact, I just can't get over the surplus of heath-benefiting ingredients in this recipe. Lemon juice, olive oil, almonds... all help to keep you strong, healthy and functioning at your best! Should I mention that it is delicious? Much more so than any McNugget or Quad Steak Burrito. But maybe I'm biased by my love for vitamins...

The Stuff:
  • large saute pan
  • food processor
The Edibles:
  • 3 cups cooked quinoa*
  • 1 medium vidalia onion, diced
  • 1 bell pepper, diced
  • 1 large bunch kale, washed and trimmed, sliced into strips (about 5 cups uncooked)
  • 5 medium garlic cloves, minced (or the equivalent of jarred or powdered garlic)
  • 1/3 cup sliced or slivered almonds, toasted
  • 1/4 cup freshly grated Parmesan
  • 1 pinch salt (more to taste)
  • hearty amount of fresh ground pepper
  • 3 tablespoons fresh lemon juice
  • 3 tablespoons extra virgin olive oil
Optional toppings and additions:
  • slivered basil
  • sliced avocado
  • crumbled feta or goat cheese
  • white beans
The Making:
  1. Heat the quinoa and set aside.
  2. Spray a large sauté pan with non-stick olive oil cooking spray and place over medium heat. Dump the equivalent of 1 clove minced or powdered garlic in pan, pushing it around with your wooden spoon or spatula for about 30 seconds.
  3. Place onion in pan and stir around so as to ensure it is completely covered with oil. Cook for about 2-4 minutes on medium, then turn down to medium low. Add the colored peppers. Stir frequently; cook until the onion turns somewhat translucent and is caramelized (really juicy looking).
  4. Remove the cooked diced onion and peppers from the pan and set aside in a bowl.
  5. Using the same pan, Spritz it with another round of non-stick olive oil cooking spray and place over medium heat. Cook 1 clove garlic, pushing it around with your wooden spoon or spatula for about 30 seconds. Add kale by the handful, stirring frequently so as to ensure oil is distributed over its surface. The green will cook down significantly, so if you feel you cannot fit it all in at once, wait until some has cooked down and add more at that point. Once all the kale is looking really wilty, turn stove off.
  6. To make the kale pesto: puree two cups of the cooked kale, 3 cloves garlic, 1/4 cup of the almonds, Parmesan, salt, pepper and lemon juice in a food processor. Drizzle in the olive oil and pulse until smooth.
  7. Just before serving, toss the quinoa, reserved onion and pepper mixture and remaining cooked kale with about 1/2 of the kale pesto. Taste and adjust if needed, you might want to add more of the pesto a bit at a time, or you might want a bit more salt or an added squeeze of lemon juice. Turn out onto a serving platter and top with the remaining almonds and some fresh basil. Some great additions include sliced avocado and feta cheese.
Serves 4 - 6.

*To cook quinoa: rinse one cup of quinoa in a fine-meshed strainer. In a medium saucepan heat the quinoa, two cups of water (or broth if you like), and a few big pinches of salt until boiling. Reduce heat and simmer until water is absorbed and quinoa fluffs up, about 15 minutes. Quinoa is done when you can see the curlique in each grain, and it is tender with a bit of pop to each bite. Drain any extra water and set aside.

Sunday, February 27, 2011

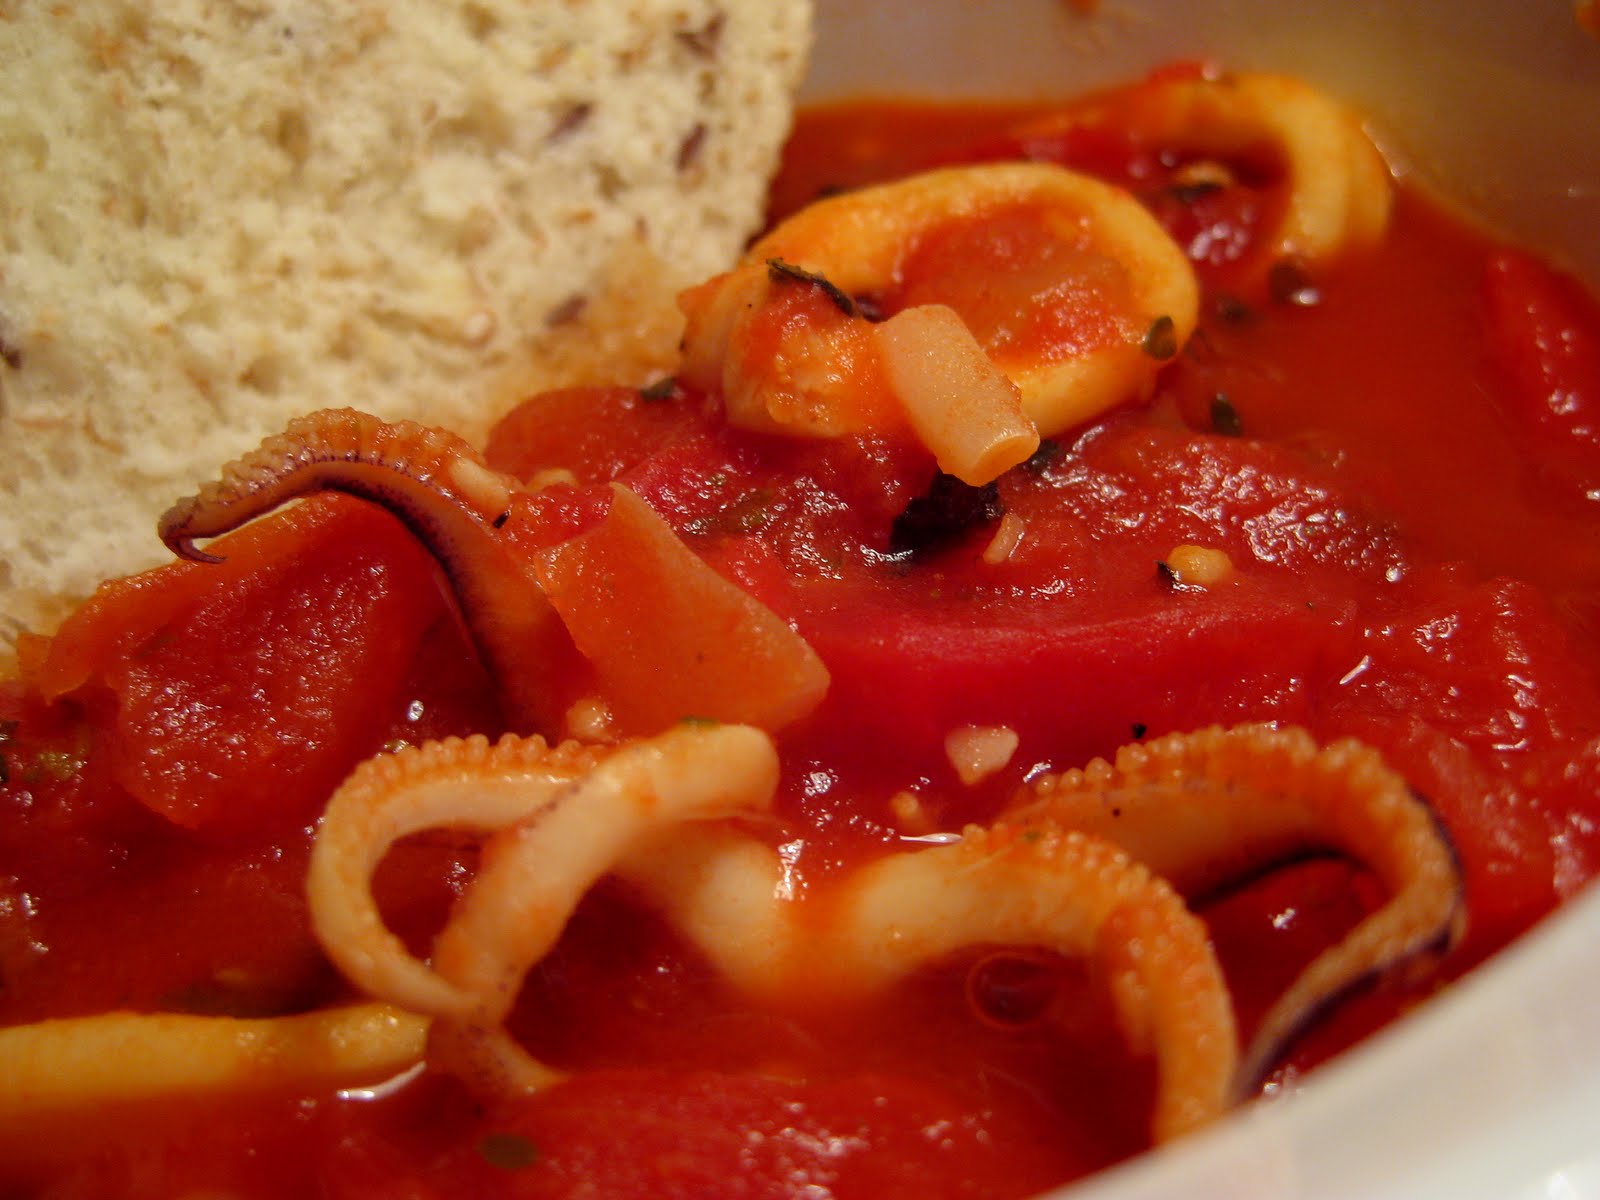
Calamari Bruschetta

It has been more than 2 months since I've posted my last recipe, but that doesn't mean I haven't been cooking up a storm! The many weeks of my absence have been full of small life changes such as moving across the country, starting a new job, and getting acclimated to a new apartment in a new city with a new culture. The shock hasn't really set in yet, but to say I've been feeling mildly disoriented would be putting it lightly. Couple my disorientation with the fact that my computer has 15 gigs of photos and videos slowing it down, the thought of adding some more is just downright daunting. Before you start getting all "an external hard drive would solve your problem and relieve your agony" on me, let me tell you that it's on my radar but ugg, could all of these moving costs just go away already?

Alright. Enough whining. More recipe-ing.

Being so close to the ocean, Philadelphia grocery stores and markets offer an array of sea creatures for purchase. I've been eying the crab, drooling at the shrimp, and swooning at the salmon, but all just seem to be a little pricey for a budget-conscious gal like myself. My solution? Calamari! At just $4 per pound, I selected two from a street market and it only ended up setting me back $1.67.

Today I'm featuring a dish that was inspired by a favorite appetizer of mine at Angelina's in Chicago. Squid is usually cooked rapidly so as to prevent the rubber band effect that can occur when overcooked. Interestingly, my research informed me that when calamari is cooked slowly, it becomes increasingly tender over time.

This is a very simple recipe that can be enjoyed in a variety of ways. It's full of tomatoey goodness (so if your boyfriend has heartburn issues like mine, it's best enjoyed with a glass of milk and some antacids). Feel free to add more mild, cooked vegetables (like diced carrots or sauteed spinach) to up the vitamin count. In a nutshell: this is low-calorie and protein-packed dish that happens to be down-right, unarguably, very delicious.
The Stuff:
  • non-stick olive oil cooking spray
  • medium-sized skillet

The Edibles:
  • 2 hand-length calamari, or about 1/4 to 1/2 pounds fresh or frozen calamari rings
  • 1 onion, diced
  • 2 garlic clove, minced
  • 1-28 oz. can diced tomatoes
  • 1/2 cup dry white wine
  • 1 bay leaf
  • pinch (or two) of dried cayenne pepper
  • hearty shake of dried oregano and basil (or fresh basil, if you're lucky and didn't kill your plant like I did)
  • salt and freshly ground pepper

The Making:
  1. Prepare fresh calamari by slicing into rings. (Follow these instructions if you're feeling uneasy about it.)
  2. Spray a skillet with olive oil non-stick spray; place skillet over medium heat. Add the onion and garlic. Stirring occasionally, for about 10 minutes or until the onion begins to turn translucent.
  3. Add the squid and saute for 3 minutes, stirring frequently.
  4. Add the tomatoes, wine, cayenne pepper, spices, salt and pepper and stir to combine. Bring to a boil, then turn the heat down low and cover. Cook uncovered on low heat for 15 minutes. Cover and cook on low heat for an additional 15 minutes.
  5. Remove bay leaf. Serve hot with fresh bread as an appetizer for 3-4 people; alternatively, serve over pasta (such as linguine) as an entree.

Sunday, December 19, 2010

My Favorite Gingersnaps

It's probably the cold weather that has caused me to want to hole up in my hole of an apartment and bake for hours. Really, I've been quite a baking machine these days. Between several varieties of scones, cookies, muffins, and cupcakes, I enjoy standing near our oven, mixing together my flours, sweeteners, leaveners, and fatteners, knowing that what I'm making will bring a smile to someone's face. I intend to wholeheartedly use this as justification for what will likely be a shocker of a gas bill this month. Because really, I just like to make people smile, and who can't help but smile when they're offered a freshly baked cookie?!

As a child I enjoyed these gingersnaps at tea parties with my bears and dolls in the beautiful, woodsy backyard of my grandparent's home. These cookies were prepared meticulously by my grandma, who undoubtedly spent quite some time rolling out tiny balls of dough to create dozens of identically-sized cookies just larger than a quarter. Having made several batches of these over the past few weeks, I have grown to love the cathartic, mind-numbing feeling of dough between my hands, rolling out ball after ball, while dancing a bit to some Beatles tunes. It helps that the end result is a well-received, soft (yet snappy) cookie that is a subtle blend of sweet ginger, cinnamon, and molasses. To prevent burning, watch these cookies carefully, especially if they're small. They can easily be stored in the freezer, but watch out, because I've found that they are just as tasty frozen!
The Stuff:
  • Mixing bowl(s)
  • Flour sifter (recommended, but I don't own one, so I just shake my flour around a bit :-)
  • Baking sheet
  • Oven
  • Cooling rack (again, I don't own one, so it's not totally necessary)
The Edibles:
  • 1 c. sifted all-purpose flour
  • 1 c. sifted white wheat flour
  • 1 T. ground ginger (slightly more if you're using a generic brand)
  • 2 tsp. baking soda
  • 1 tsp. ground cinnamon (slightly more if you're using a generic brand)
  • 1/2 tsp. salt
  • 1 T. ground flax seed
  • 3 T. water
  • 3/4 c. shortening (I used Crisco!)
  • 1 c. granulated sugar
  • 1/4 c. dark molasses
  • 1/3 c. cinnamon sugar (1/3 c. sugar with a few hearty shakes of cinnamon mixed in well)
The Making:
  1. Preheat oven to 350 degrees F (175 degrees C).
  2. Sift the flours, ginger, baking soda, cinnamon, and salt into a mixing bowl. Stir the mixture to blend evenly, and if you're feeling ambitious, sift a second time into another bowl.
  3. Mix flax seed and water in a small bowl or cup, and let it sit for at least 3 minutes.
  4. Place the shortening into a mixing bowl and beat until creamy. Gradually beat in the white sugar. Beat in the flax seed water mixture and dark molasses. Sift 1/3 of the flour mixture into the shortening mixture; stir to thoroughly blend. Sift in the remaining flour mixture, and mix together until a soft dough forms. Pinch off small amounts of dough and roll into 1 inch diameter balls between your hands. Roll each ball in cinnamon sugar, and place 2 inches apart on an ungreased baking sheet.
  5. Bake in preheated oven until the tops are rounded and slightly cracked, about 10 minutes. Larger cookies may take longer. I would recommend checking every minute or so around the 10 minute mark.
  6. Cool cookies on a wire rack. Store in an air tight container.
Recipe makes about 60 cookies.

Sunday, December 12, 2010

Cranberry Apple Nut Yogurt Scones

Burr! It's cooooold here in Chicago! Slightly sweet, not too heavy, these scones are a great little treat for a cold winter morning... and considering they're nutritionally enhanced through the incorporation of whole grains, fruit, and healthy fats from the nuts, you shouldn't feel guilty if you have more than one!

If you're averse to cranberries (ahem Momo), fear not! This recipe is merely a base that can be adapted to your preferences and ingredients on hand. For the cranberries and apple you can substitute anything from raisins to blueberries, raspberries to snozberries... And your favorite nut variety can can stand in for the hazelnuts! Play around!
The Edibles:
  • 1 c. boiling water
  • 1/2 c. dried cranberries
  • 1/2 c. dried apple, chopped
  • 2 c. all-purpose flour
  • 2 c. wheat flour
  • 1/2 c. sugar
  • 3 T. baking powder
  • 3/4 c. (1 & 1/2 sticks) cold butter or margarine
  • 1 c. chopped hazelnuts
  • 1 c. vanilla nonfat yogurt
  • 1 c. fat free half-and-half
  • 1 egg, lightly beaten
The Making:
  1. Preheat oven to 350°F. Add water to cranberries; stir. Let stand 10 min. to plump cranberries. Meanwhile, mix flours, sugar and baking powder in large bowl. Cut in butter with pastry blender or 2 knives until mixture resembles coarse crumbs. Add walnuts and drained cranberries; mix well. Add yogurt and half-and-half; stir just until dry ingredients are moistened.
  2. Divide dough into 3 pieces. Pat each piece into 6-inch round on floured surface; cut each into 8 wedges. Place wedges, 2 inches apart, on ungreased baking sheets; brush with egg.
  3. Bake 15 to 18 min. or until lightly browned. Serve warm.
The original recipe that inspired this interpretation said that this makes 24 scones... I made 28. I'm special like that.

Saturday, December 11, 2010

No Worry Crock Pot Curry

Curry powder. You may not have guessed it by looking at it, but it can pack a potentially life-altering, health-improving punch. It's a complex combination of herbs and spices that generally includes coriander, turmeric, cumin, fenugreek, and red pepper, but will sometimes be supplemented with additional ingredients such as ginger, garlic, asafoetida, fennel seed, caraway, cinnamon, clove, mustard seed, green cardamom, black cardamom, mace, nutmeg, long pepper, and black pepper.

So what makes curry powder so great? Well, many of its ingredients have been linked to improvements in health indicators. What am I talking about? Let's look at an example...

Why tumeric rocks:
  • It may help relieve joint pain experienced by people living with arthritis because tumeric contains more than 24 compounds that fight inflammation in the body.
  • It may help those living with digestive disorders such as irritable bowel syndrome (IBS), because tumeric can aid digestion and reduce disturbances such as heartburn, bloating and gas.
  • It may help those with high cholesterol, because studies have shown that tumeric may assist in the reduction of LDL levels (bad cholesterol), thereby helping prevent atherosclerosis (the buildup of plaque in the artery walls)
(For more information about the benefits of curry powder and tumeric, visit here and here.)

Fueled by my love for easily prepared, tasty, nutrition-packed meals, I set out to create a healthy crock pot curry recipe. The challenge for me was creating a recipe that resembled the classic coconut curry my mom used to make, but was a bit lighter in that it didn't use coconut milk.* I wanted to develop a curry dish that was well-balanced and allowed me to recognize the veggies, chicken, and grain because they weren't completely smothered in sauce. Go ahead, call me a purist. (For a vegetarian version, omit chicken and substitute vegetable broth or water for the chicken broth.)

Speaking of veggies, feel free to add whatever you may have on hand. Some bell pepper strips or cauliflower would be great additions both flavor and health-wise. Serve over a mini grain like rice, quinoa, or cous cous, and top your curry with one, two, or all of my suggestions below. (Before you judge my vanilla yogurt idea, I'd recommend giving it a whirl because I can pretty much guarantee that you'll be just as surprised as I was by its yum factor! Try it!)
The Stuff:
  • non-stick olive oil cooking spray
  • medium sauté pan
  • crockpot
The Edibles:
  • 2 boneless skinless chicken breast halves, chopped into bite-size pieces
  • 1 medium potatoes, chopped into pieces the same size as your chicken
  • 1/2 medium onion, diced
  • 2 carrots (about 1 & ½ c.), sliced (can use frozen)
  • 2 c. chicken broth
  • 1 tsp. coconut extract
    *Of course you could use coconut milk in this recipe if that's what your heart desires; substitute 1 cup milk for one cup of broth; omit extract and honey
  • 2 T. honey
  • 1 T. flour
  • 2 T. curry powder
  • hearty shake of the following: garlic powder, onion powder, and coriander
  • salt and pepper, to taste
  • 1 c. frozen peas, thawed
Optional Toppings:
  • 2 T. vanilla yogurt
  • 1 tsp. hot sauce
  • 2 -3 tsp. toasted flaked coconut
  • 1 T. slivered almonds
The Making:
  1. Spray a medium-sized saute pan with non-stick olive oil cooking spray. Place pan over medium-high heat. Add chicken and on all sides.
  2. Doing this quick cook will help seal in the moisture of the chicken and prevent your meat from disintegrating in the crock pot.
  3. Place potatoes and onion in crock pot. If using fresh carrots, add at this time. Top with seared chicken.
  4. Whisk together chicken broth, coconut extract, honey, flour, curry powder, dashes of spices, and a pinch of salt and pepper (you can add more after cooking). Pour over chicken and vegetables.
  5. Cover; cook on high for 3 to 3 & ½ hours or LOW 6 to 7 hours.
  6. Add peas and carrots (if you’re using frozen) at this time. Allow the curry to cook for 30-45 minutes on high with the cover removed in order to thicken the sauce.
  7. Serve over rice, quinoa, cous cous or whatever else you may have on hand!
Optional topping ideas: a dollop of vanilla yogurt, hot sauce, flaked coconut, slivered almonds.

Wednesday, October 13, 2010

Teriyaki Tofu

I feel like everyone has their own favorite way to cook tofu. I know tofu may not be everyone's cup of tea, but I'm a big advocate of trying everything three times, perhaps in various forms. Whether it's a vegetarian protein, yoga class, sushi roll, or tv show, I've found that by the third try I'll have a good idea of whether or not something's for me. (Side note: I both love and hate the fact that Jay avoids all things tofu... love because it means that there's more for me... and hate because I want him to enjoy its deliciousness and health benefits with me. For me it has become a challenge to try cooking tofu various ways in hopes that one way will tickle his taste buds! I rarely cook it the same way twice!)

Enough rambling. Let's get down to business.
The Stuff:
  • cutting board
  • clean cloth towels or a stack of paper towels
  • several large heavy books
  • shallow baking dish
  • medium to large sauté pan
  • olive oil non-stick cooking spray
  • 1 package firm or extra-firm water, drained
  • 1/4 c. teriyaki sauce (and more to taste)
The Making:
  1. Place the block on a cutting board and cut the tofu into 4 even rectangles. (See diagram below.)
  2. Take the blocks and lay them out on an absorbent towel or a few layers of paper towels. Cover with another clean cloth towel or more paper towels. Place a heavy book or two atop the tofu and allow the weight to press the water out of the tofu for 30 minutes to 1 hour.
  3. Once pressed, place on a baking tray lined with wax or parchment paper. Place in the freezer for about 1 hour.
  4. Remove tofu from the freezer. Pour about 2 tablespoons of teriyaki sauce in the bottom of a shallow bowl or baking pan that is large enough to allow for a single layer of tofu blocks. Lay frozen tofu atop the sauce and drizzle an additional 2 tablespoons of teriyaki sauce over the tofu. Depending on the amount of time you have, you can refrigerate the marinating blocks while you go to work (up to 8 hours) or leave out on the counter for 1 hour. Flip tofu blocks carefully if you are available to do so.
  5. After marinating, tofu is ready to sauté. Place a medium to large saute pan over medium heat. Generously spritz your pan with olive oil non-stick cooking spray. If desired, cut tofu into smaller pieces. Place tofu onto hot pan and do not touch, check, or move for at least 5 minutes. The key to a good crust is not to fiddle with your 'fu! Once at least 5 minutes have passed, check for a dark crust and flip each peice if it's ready.
Serve with stir fry vegetables, noodles (or spaghetti squash for a vitamin-punch) and a drizzle of more teryiaki sauce.

Sunday, September 19, 2010

Carrot Hummus

Not to toot my own horn or anything, but I'm pretty sure I'm going to be the best mom... at least when it comes to hiding vegetables in the food I feed my kids. Now, hummus is undeniably a staple in my diet, and there's no questioning its power food status, but I'm always looking for a way to amp things up a few notches in the vitamin/mineral components of any dish. Adding canned or frozen carrots provides some additional vitamin A; these carrot forms are softer and therefore blend quite a bit easier into the hummus. By all means one could boil fresh carrots and achieve the same effect. Further amping up the hummus with a scoop of unflavored protein powder gives each serving a gram or two more of satiating protein. Adding protein powder to meals can be especially important if one's diet is primarily vegetarian. At least I think it is... supposedly Americans get more than enough protein...

Anywho, this hummus is tasty and packed with nutritional benefits. Lately, when I'm not experimenting with edamame, spinach, or red pepper versions, this is my go-to recipe. It's pretty straight-forward, and (as you may have guessed by my use of approximate amounts) extremely forgivable.
The Edibles:
  • 1 16-oz. can of garbanzo beans (also known as chick peas), rinsed and drained
  • 3/4 of a 16 oz. can of carrots (or about 1 c. frozen carrots, thawed), drained
  • 1 T. tahini (sesame seed paste)
  • 1 tsp. extra virgin olive oil
  • 2 T. lemon juice
  • 2 cloves garlic (or the equivalent in jarred or powdered)
  • generous sprinkling of fresh or dried parsely
  • generous shake of ground coriander
  • light sprinkle of onion salt (alternatively you could use onion powder generously)
  • 1 scoop natural, unflavored protein powder
  • enough water to get the blender/processor blade a-movin' (add 1 T. at a time)
  • sea salt and black pepper to taste
The Making:
  1. Whir together all the ingredients in a food processor or blender.
  2. If you're patient, chill hummus for at least 30 minutes. (You'll be amazed by how much more intense the flavors become in such a short amount of time!)
  3. Store in a sealed container for maximum one week.
Serving Suggestions: Serve with pita chips, pretzels, cucumber slices, bagel chips, or (gasp!) carrots!

Saturday, September 18, 2010

Avocado & Tempeh Cheese Sandwich

It seems like "green" is the theme for my cuisine these days. This sandwich is a simple, delicious, vegetarian option that lends itself to interpretation based on the veggies and other toppings you have on hand.

This "recipe" uses tempeh right from the package. I love tempeh in all forms; I think it can be great sautéed but just as good un-cooked. In fact, I've found its straight-from-the-package form to be a lovely addition to the traditional PB&J! I know that it may be an acquired taste, but I particularly enjoy the nuttiness and bit of crunch it offers in its beany, protein- and fiber-packed little block!
The Edibles:
  • 2 slices of your favorite multi-grain braid
  • honey mustard
  • several slices of tempeh, sliced about 1/4 inch thick
  • 1/4 of an avocado, sliced
  • 1 wedge of Laughing Cow spreadable cheese
  • several basil leaves
  • salt and pepper, to taste
The Making:
  1. If you prefer, toast your bread. Spread one slice of bread (or toast) with honey mustard to your liking.
  2. Layer tempeh, avocado, cheese, and basil on the mustard slice. Sprinkle with fresh ground pepper and salt (or omit for a lower-sodium option).
  3. Top with second slice of bread, and dig in!

Monday, September 6, 2010

Almond Banana Muffins

For months now, I have had a box of Trader Joe’s Multigrain Baking Mix sitting in my cupboard, unopened. Though I’ve had inspirations for its use, I haven’t acted on any… until now.

I’ve mentioned before how I take after my grandma (hi, Mommom!) who will go to extremes not to waste a morsel of any food. Leftover dip? Use it as a bagel spread for the next 3 days. A loaf of marble rye looking like it will go uneaten? Not if she can help it! Thick slices of that loaf will be reincarnated as French toast for breakfast… for 5 days. Oh memories...

When I spotted a banana in our fruit basket, enveloped in brown peel, it signaled to me that its days were numbered. What else was I to do but put it out of its misery? It was the humane thing to do... and it satisfied the Mommom in me, because I ensured it did not go to waste.

And waste it most definitely did not become! Behold! A moist muffin rich in whole grain goodness, full of ingredients that can lower cholesterol and prevent heart disease. And should I add that it is boy-approved? Right on.
Makes 6 normal-sized muffins.

The Edibles:
  • 1 T. milled flax seed
  • 2 T. + ¼ c. water
  • ¼ tsp. almond extract
  • ¼ c. agave nectar
  • 4 tsp. granulated sugar
  • 1 tsp. vegetable oil
  • 1 c. baking mix (such as Trader Joe’s or Bisquick)
  • ½ c. oat bran
  • hearty shake of cinnamon
  • 1 very ripe banana
  • 10 raw almonds, crushed or coarsely chopped
The Making:
  1. Preheat oven to 350 degrees.
  2. Mix together first 6 ingredients; set aside.
  3. Mix together the baking mix, oat bran, and cinnamon. Add in banana and flax seed liquid from step 2. Mix well, but don’t worry if you see chunks of banana hiding in your batter. They will become delicious morsels in your muffins. Fold in almonds and ensure they are evenly dispersed in your batter.
  4. Bake for 15-20 minutes, using a toothpick to ensure they are fully cooked.
Umm yeah. Definitely boy-approved.
Devoured.

Sunday, September 5, 2010

Polenta Notso-Deep-Dish Pizza

Recipes for polenta pizza have popped every now and again in my searches for dinner ideas. In the mood for pizza, but lacking any crust options (I’ve used bagels, English muffins, tortillas, and pitas all with satisfying results), I decided to test the waters and try my hand at making a deep dish polenta pizza. Please note that I have never successfully executed making polenta from scratch using cornmeal, so I certainly was challenging myself in making this!

Despite the odds being stacked against me (and my pizza to-be), this pie came out of the oven and satisfied my craving (albeit a little less "deep" thank I'd hoped). Even the biggest healthy food critic (and unhealthy food fanatic) nodded his head in approval. It certainly is not the same as Giordano’s, but it is much lighter and offers a break from the traditional heavy, doughy pizza crust.

Furthermore, in comparison to standard pizza dough, cornmeal as a crust also offers more bang-for-your buck nutrient-wise.

“New research published in October’s issue of the Journal of Agricultural and Food Chemistry reveals significant health benefits in milled yellow corn products, such as corn meal, grits and corn flour. The study, authored by Mario Ferruzzi, Ph.D., associate professor, department of food science, Purdue University, West Lafayette, Ind., demonstrates milled yellow corn products are rich in antioxidants, especially carotenoids, such as lutein. Carotenoids are yellow and orange plant pigments known for their association in the prevention of chronic diseases including cancer, cardiovascular disease and macular degeneration.

"Additionally, carotenoid levels in milled corn products can be more than 50 per cent bioaccessible, or available for absorption after digestion. The process of milling corn products makes key vitamins and nutrients more easily bio-available than they would be from many other foods.” (Source: Baking Management)
The Stuff:
  • medium saucepan
  • 8-inch pie pan
The Edibles:
  • non-stick olive oil cooking spray
  • 1 c. cornmeal
  • ½ tsp. garlic powder
  • sea salt
  • ½ c. frozen chopped spinach
  • ¾ c. shredded mozzarella or Italian blend cheese
  • ¼ c. mushrooms, coarsely chopped (half of a 4 oz. can)
  • ½ c. of your favorite marinara sauce
  • ½ tsp. dried Italian spice blend
The Making:
  1. Preheat oven to 450 degrees. Spritz a 8-inch pie pan with olive oil non-stick cooking spray.
  2. In a medium saucepan place 3 cups water seasoned with garlic power and a pinch of sea salt. Bring just about to a boil, reduce heat to medium, and add cornmeal in a steady stream, whisking all the while to prevent lumps from forming. Turn heat to low and simmer, whisking frequently, until thick, 10 or 15 minutes. If mixture becomes too thick, whisk in a bit more water; you want a consistency approaching thick oatmeal.
  3. Spoon your newly formed polenta into prepared pie pan, working quickly so that the mixture does not stiffen. Spread it evenly to a thickness of about 1/2 inch over the bottom and sides of the pan.
    Optional: Cover baking sheet with plastic wrap and put it in refrigerator until it is firm, an hour or more (you can refrigerate polenta overnight if you prefer). I note that this is optional because by the time I got around to the next step, my polenta was super-firm.
  4. Put polenta in oven and bake for 10 to 15 minutes, or until it begins to brown and crisp on edges. Meanwhile, microwave frozen spinach until thawed. Squeeze out excess water and set aside.
  5. Remove polenta from oven, sprinkle with half of the cheese. Disperse spinach and mushrooms evenly over the top of the cheese. Spread marinara sauce over the top of the veggies. Cover the marinara with the remaining cheese and sprinkle with Italian seasoning. Place pizza back in oven for an additional 10 to 15 minutes, two minutes, or until cheese begins to golden.
  6. Cut into slices and serve to curious guests with a fork. Refrigerate leftovers for a delightful treat the following day!

Monday, August 30, 2010

Macaroni and Cheese with Cauliflower

Mac and Cheese is one of those dishes that is easily manipulated for increased health points. Adding vegetables, subbing wheat pasta for white, and using less of a more flavorful cheese are all easy changes that add vitamins, reduce fat, but maintain flavor. This modified version is so healthy, that a hearty serving is mighty filling without all of the heaviness characteristic of traditional baked casseroles.

I made several modifications to the recipe below which I eagerly retrieved from another recipe blogger, Tina. Ingredients that I changed are indicated with an asterisk in the original recipe provided below. Here are some notes about my changes...
  • Instead of fresh cauliflower I used a 16-ounce bag of the frozen vegetable. According to the National Institutes of Health, "Generally, vegetables are canned or frozen immediately upon harvest when their nutrient content is at its peak." Knowing this, there is virtually no excuse for skimping on your veggie intake; vegetables in the freezer section of your grocery store are almost often conveniently packaged in pre-sliced, par-cooked form. All that stands between you and their nutritional benefits is a little thawing. (Enter our favorite appliance: the microwave.) It came as a suprise to me to learn that cauliflower is a significant source of Vitamin C. For more information about this vegetable, check out its federal profile on the CDC website.
  • Instead of bread, I used 1/2 cup of breadcrumbs with 1 piece of wheat bread and some multigrain pita chip crumbs.
  • Instead of 1% milk, I used skim, because it was what I had on hand. I suppose the small addition of fat from the milk would make this even creamier.
  • Instead of sour cream, I used plain, nonfat yogurt, making this dish a calcium power-punch. Eating 3 daily servings of low-fat dairy products can offer a number of health benefits; advantages can include increased bone strength, maintanence of healthy weight, and improved heart function and healthy blood pressure. More about these dairy-induced gains is provided by the National Dairy Council.
The Edibles:
  • 12 oz. multigrain elbow macaroni (or any smallish pasta)
  • 1 head cauliflower, roughly chopped*
  • 4 slices multigrain bread, torn*
  • 1/2 c. fresh flat-leaf parsley, chopped
  • 3 T. extra virgin olive oil
  • Kosher salt and pepper
  • 1 onion, finely chopped
  • 1 & 1/2 c. (6 oz.) grated extra-sharp Cheddar cheese
  • 1 & 1/2 c. reduced-fat sour cream*
  • 1/2 c. 1% milk*
  • 1 T. Dijon mustard
The Making:
  1. Heat oven to 400° F. Cook the pasta according to the package directions, adding the cauliflower during the last 3 minutes of cooking time; drain.
  2. Meanwhile, pulse the bread in a food processor until coarse crumbs form. Add the parsley, 2 tablespoons of the oil, and 1/4 teaspoon each salt and pepper and pulse to combine; set aside.
  3. Return the pasta pot to medium heat and add the remaining tablespoon of oil (I used non-stick olive oil cooking spray). Add the onion, 3/4 teaspoon salt, and 1/2 teaspoon pepper and cook, stirring occasionally, just until soft, 5 to 7 minutes. Mix in the pasta, cauliflower, cheese, sour cream, milk, and mustard.
  4. Transfer to a shallow 3-quart baking dish that has been greased with non-stick olive oil spray, sprinkle with the bread crumbs, and bake until golden brown, 12 to 15 minutes.
Yield: Makes 6 servings

Estimated Nutrition Facts per Serving (For Original Recipe)
Calories: 537; Fat: 23g (sat 9g); Cholesterol: 51mg; Carbohydrate: 63g; Sodium: 692mg; Protein: 24g; Fiber: 8g; Sugars: 8g

Sunday, August 22, 2010

Edamame Power Hummus

Some call edamame the super or wonder vegetable because it is the only vegetable that contains all nine essential amino acids. This makes edamame a complete protein source, similar to meat or eggs. Edamame also contains isoflavonoids. They are found in all soy products and are being studied for their health benefits.
Although most researchers agree that further research is needed, recent studies propose the following possible health benefits of soy:
  • Soy protein may help reduce insulin resistance, kidney damage, and fatty liver in people with diabetes, according to a study in rats.
  • A new study from the Chinese University of Hong Kong indicated that soy protein containing isoflavones (phytoestrogens) significantly reduced overall cholesterol and LDL "bad" cholesterol, and raised HDL or "good" cholesterol, especially in men.
  • A study in women reported that regular consumption of soy foods was associated with healthy cholesterol levels.
  • The component thought to be at least partly responsible for soy's health benefits is a type of phytoestrogen called isoflavones. Isoflavones also appear to work with certain proteins in soy to protect against cancer, heart disease, and osteoporosis.
  • Results from a new study in China suggest that eating more soybean protein may help prevent and treat hypertension.
  • A study in which 12 postmenopausal women drank 36 ounces of soy milk daily for 16 weeks noted an anti-inflammatory effect of the isoflavones found in soy. According to the study authors, this may be important in the prevention of bone loss and cancer, among other things.
I found my edamame pre-shelled in the frozen foods section of Trader Joe's. It is rarely sold fresh, but it is available frozen year-round. Don't fear frozen veggies; studies have shown that they can be just as--if not more--nutritious than their fresh counterparts. Of course, some taste better when eaten fresh (zuchinni and asparagus to name a few), but edamame is one vitamin powerhouse that maintains its punch (and subtle crunch) when thawed.
The Edibles:
  • 3/4 of a 16-oz. can of garbanzo beans (also known as chick peas)
  • 1/2 c. edamame, shelled
  • 1 T. tahini
  • 2 T. lemon juice
  • 2 cloves garlic (or the equivalent in jarred or powdered)
  • generous sprinkling of fresh or dried parsely
  • generous shake of ground coriander
  • light sprinkle of onion salt (alternatively you could use onion powder generously)
  • sea salt and black pepper to taste
The Making:
  1. Whir together all the ingredients in a food processor or blender.
  2. Refrigerate for at least 30 minutes for prime flavor-age. Conversely, you can be like me and excitedly use any vessel on hand to deliver your Edamame Power Hummus straight to your tongue. Store in a sealed container for maximum one week.
Sources:

Saturday, August 14, 2010

Homemade Almond Butter

The serious female domination in my family has taken on a life of its own. Just recently we've jokingly labeled ourselves (rather proudly, I should add) the Association of Major Boss Ladies. Though some of us younger generations are more appropriately titled, "Major Boss Ladies in Training [MBL(IT)]", the name is perfectly descriptive of our collective bossiness (though we prefer to say that we're just a group of definitive decision makers, movers, and shakers).

Nevertheless, I believe it is an almost unanimous trait (Momo may be the only exception) of all Boss Ladies to have a particular weakness for nut butter. For a group of strong-willed women, we all are hilariously perilous when faced with a jar of creamed nut.

Thus, I decided to make my own nut butter. As a Major Boss Lady in Training, I will be able to control just how much I make and of what exactly it is made. My guess is that this recipe will make about 4 tablespoons. (I only guess because I made mine with about 1/2 as many nuts and didn't measure the outcome before I spread it on toast... perilous, I tell you!)

In theory, 4 tablespoons should be enough to cover at least 2 sandwiches (depending on your shmearing tendencies), and isn't enough to cause serious damage if ingested all at once. Hey, we all have our vices, right? It's about working with them and allowing ourselves a little wiggle room so we don't go crazy!!
The Edibles:
  • 24 almonds, roasted, unsalted
  • 1/2 tsp. cinnamon
  • pinch of salt
The Making:
  1. Grind up ingredients in food processor until you have made a paste. Unless you're fortunate enough to have a heavy duty food processor, it's recommended that you grind for 30 seconds to one minute and allow for 30 second breaks in between sessions. This will help ensure you don't overwork your appliance.
  2. Store in an air tight container in the refrigerator for up to 1 week.

Monday, August 9, 2010

Yummy Yammy Salad

Chicago is hot in the summer. Cost-saving efforts cause us to leave the A/C off until it is deathly blazing. Needless to say, on one particularly hot day for dinner I wanted to make sweet potatoes (mostly because they were the only potato type in the vicinity of our kitchen), but I could not fathom turning on a stove or oven or any other heat-producing appliance. Enter the 20th century marvel: the microwave oven. I cubed the lone potato we had in our possession, plopped it into a microwave-safe Pyrex bowl with about a half-inch of water and covered it with a large plate, and nuked the taters until they were fork-soft.

Upon removing from the miracle wave appliance, I carefully drained the hot water from the dish and tossed in with the dressing. Loosely cover and refrigerate for at least 30 minutes for prime flavor maximation.

If you have the means, this dish may be improved with the addition of fresh chopped basil. Nom nom nom!
The Edibles:
  • 3 T. balsamic vinegar
  • 1 T. honey Dijon mustard
  • 1 tsp. dried oregano
  • 1/2 tsp. garlic powder
  • 1 medium-sized sweet potato, cubed and cooked
  • sea salt and pepper, to taste
The Making:
  1. Whisk together first 4 ingredients. Pour over cooked sweet potato cubes. Stir gently to cover cubes with balsamic dressing.
  2. Try a bite. Add salt and pepper if desired.

Thursday, August 5, 2010

Cucumber and Tomato Salad

Another recipe that uses cucumbers? Another that uses tomatoes? You may be sick of these basic veggies (or are they fruits?), but here in this household they're a staple because they're in season, fresh, inexpensive, and above-all, good for you!

The main reason I decided to even post this ridiculously basic recipe is to share the making of the ridiculously delicious dressing for the cucumbers and tomatoes. It is pretty much inevitable that you will not have the spice blend I used on hand, I'm sure it will be just as delicious with some sprinkles of paprika and onion powder... or completely omitted. If you have the means, I highly recommend searching for the Celestial Seasonings blend or a spice blend like it, because the flavors are a great mix that can be used to amp up anything from tofu to pork chops. (A suggestion as a substitute: Perfect Pinch Roasted Garlic Bell Pepper Seasoning from McCormick)

The Edibles:
  • 1 T. rice vinegar
  • 1 T. apple cidar vinegar
  • 1 T. honey dijon mustard
  • 1/4 tsp. garlic powder
  • 1/2 tsp. dried oregano
  • hearty shake of Celestial Seasonings "Sweet Peppers and Onions" blend
  • 1 cucumber, zebra peeled & sliced
  • 2 c. cherry tomatoes, cut into quarters
  • sea salt & pepper, to taste
The Making:
  1. Whisk together first 6 ingredients. Pour over cucumber slices and tomato quarters. Stir gently to make sure all of your veggies get covered with some of the dressing's goodness.
  2. Try a bite. Add salt and pepper if desired.