Monday, June 28, 2010

Tequila-fied Grilled Mahi-Mahi with Cilantro Rice Pilaf

I love me some fish! Many of my favorite summertime meals involve fish with some sort of cilantro-infused salsa. I'll admit that I served this dish with some jarred store-brand mango-lime salsa simply because I had a craving. It wasn't necessary though, because the sauce for this fish is mighty flavorful.

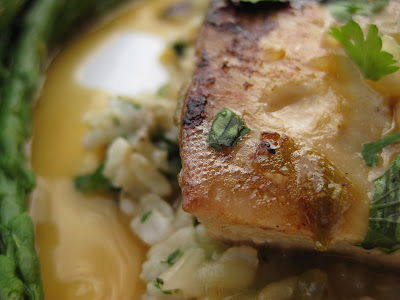
I'll also admit that we had a bit of a mis-hap with the grill. (I say "we" because Jay was my Grill Master for this dish.) When grilling fish it's recommended that one oils the grates (you can do so by carefully using a towel drenched in oil gripped with some tongs--I researched it hard-core), but because our grill is technically not ours we chose to place the fish on an oiled tray that we shaped out of a large piece of aluminum foil. Despite our efforts, the grill never got hot enough. After 12 minutes, the fillets still did not appear done. Not to be left with an un-crispified fish, I pan seared the fillets in an oiled skillet over medium-high heat for about 2 minutes per side. The result? Well the pictures tell the story.

And as far as the flavor goes? You won't be disappointed. We weren't.
The Stuff:
  • non-reactive bowl or bag for marinading
  • grill (or apparently this can be done on a stove top with a skillet--who knew?!)
  • small sauce pan (for the sauce)
The Edibles:
  • 4 skinless mahi-mahi fillets, approximately 2 pounds
  • 2 teaspoons kosher salt
  • 1/2 c. diced red onion (I used onion powder because we are presently onionless)
  • 1/4 c. freshly squeezed lime juice (I used the juice of a fresh lime and supplemented with about 2 tablespoons lemon juice)
  • 1/4 c. freshly squeezed orange juice
  • 1 T. minced jalapeno
  • 1/4 c. dark brown sugar, packed
  • 1/4 c. tequila
  • 1 T. olive oil
  • 1/4 c. freshly chopped cilantro leaves
The Making:
  1. Rub the fillets with kosher salt and set aside.
  2. In a non-reactive bowl or plastic bag for marinating, combine the onion, lime juice, orange juice, jalapeno, sugar and tequila. Mix to dissolve the sugar, and add the fillets to the bowl or bag. Marinate in the refrigerator for 2 hours, turning the fillets once after 1 hour.
  3. Remove the fillets from the marinade and set it aside. Pat the fillets dry with paper towels and lightly coat with olive oil cooking spray.
  4. Heat a grill to high and place the fillets over direct heat until they are just cooked through - opaque at the center but still moist, approximately 3 to 4 minutes per side.
  5. While the fish is grilling, transfer the reserved marinade to a saucepan and heat until it is reduced to about 3/4 cup.
  6. Using tongs, remove the fillets to serving plates and divide sauce equally among them. Top with the cilantro.
Rice Pilaf

The Stuff:
  • medium sauce pan
Edibles:
  • 1 T. butter
  • 1/2 T. olive oil
  • 1 garlic clove, minced (or the equivalent in jarred or powdered)
  • a shake of onion powder
  • 1 c. brown rice
  • 1 T. lemon juice
  • 1/4 c. frozen spinach
  • 1/4 c. cilantro, chopped
The Making:
  1. Heat a medium sauce pan over medium-high heat. Add butter, olive oil, and garlic; cook 30 seconds, stirring to encourage the ingredients to cover the bottom of the pan.
  2. Add rice; stir to ensure it is covered by butter and oil mixture. Cook over the heat for an additional 1 to 2 minutes, allowing the rice to toast a bit.
  3. Add lemon juice, onion powder, and water. Bring to a boil; cover and simmer for the amount of time recommended in the instructions accompanying your rice. (Our was "10 Minute" rice, but some types require 20 to 30 minutes, so proceed as instructed.)
  4. Once the rice has absorbed all of the water, allow it to stand 2 minutes. Add frozen spinach, and stir. I will often times add the spinach, recover the rice and allow it to sit for 5 minutes, after which it will have defrosted and make for easier encorporation in the pilaf.
  5. Add cilantro and salt and pepper to taste.

Tuesday, June 22, 2010

Banana Oatmeal Chocolate Chip Cookies

Yet another cookie recipe? I had to! (And once you try them, you'll know why too!)

This recipe comes from a cookbook, called Thinkfood, that is chock-full of brain-boosting concoctions. I'm not sure if it's legal for me to reproduce this, but it is available online, and honestly, it's too good not to share! The book notes that this recipe is good for the brain because it includes a combination of "brain foods": chocolate, banana, flax, and walnuts.

Side note: For soft, sweet cookies, make sure the bananas are really ripe. The ripeness adds a natural sweetness and gives them a smooth, chewy texture.
The Edibles:
  • 1/2 c. whole wheat flour
  • 1 c. rolled oats (not instant)
  • 1/2 tsp. baking powder
  • 1/2 tsp. baking soda
  • 1/4 tsp. cinnamon
  • 1 T. ground flaxseed meal
  • 1/4 c. agave nectar
  • 1/4 c. soy milk (can substitute regular milk)
  • 1/2 tsp. vanilla extract
  • 1 T. canola oil
  • 1 ripe banana
  • 1/2 c. dark chocolate chips
  • 1/4 c. walnuts, chopped
The Making:
  1. Preheat oven to 350 degrees F.
  2. Combine all ingredients in a large bowl. Mix well until batter is blended evenly.
  3. Use a tablespoon to portion cookies on a greased baking sheet, approximately 1-2 inches apart.
  4. Bake cookies for 12-15 minutes.
  5. Remove cookies from baking sheet once they are just beginning to turn golden (and look a little underdone). Allow to cool on wire rack.
Makes approximately 25 cookies.

Wednesday, June 16, 2010

Banana Soft Serve

Two days ago I purchased a food processor. Using both a coupon and a gift certificate ordered through my bank's rewards program, the appliance cost me just over $10. Even if I had paid the original $40 for which it was listed, the ability to make this sweet treat would have has made it worth every penny. Seriously. Not only is it totally guilt-free (I mean seriously, it's pretty much just a banana), but it really has the consistency of soft serve, a dessert that around here goes for at least $4... without any additional toppings. I had been trying for weeks to make this in my blender with little success (it never really, totally blender-ized/soft-serve-ized, no matter how much I varied the banana-to-liquid ratio), so seeing this come to fruition this evening really made me giggle. I can't wait to play with this some more! (I hear peanut butter is a good add-in... stay tuned!)
The Stuff:
  • food processor
The Edibles:
  • 1 banana, broken into at least 4 pieces and frozen
  • 1-2 T. milk
  • about 2 drops vanilla extract
  • 1 packet Splenda (or 2 tsp. sugar), optional
The Making:
  1. Place all ingredients in a food processor and whirl away. Eventually you will have a mixture the consistency of soft serve ice cream!

Tuesday, June 15, 2010

Sautéed Tempeh

I've already declared my love for tempeh, so I'll spare you from reiterating my adoration for this vegetarian protein source. I love it sautéed, and you'll see that this time I served it over a bed of romaine alongside some sautéed mushrooms, sliced and toasted almonds, sliced dates, crumbled feta cheese, and some Italian dressing. That pita-like thing you see on the side happens to be a protein pancake, one of my go-to foods for post-workout nourishment!
The Stuff:
  • medium sauté pan
  • dish or bowl for marinading

The Edibles:
  • 1/2 of one package tempeh, cut into chunks that are about 1 inch by 1 inch by 1/4 inch
  • 2 T. white wine vinegar
  • 1 T. dijon mustard
  • 1 T. olive oil
  • dried Italian seasoning
  • onion powder
  • garlic powder
  • salt and pepper to taste
The Making:
  1. In a small bowl whisk together white wine vinegar, dijon mustard, olive oil, and generous shakes of Italian seasoning, garlic powder, and onion powder. Add salt and fresh ground black pepper to taste.
  2. In a shallow bowl or large plastic bag mix all ingredients together up through the fresh ground pepper. Add the tempeh and stir around (or shake the bag) until the tempeh appears well covered with the sauce.
  3. Marinade anywhere between 1 hour to overnight.
  4. Place medium-sized sauté pan over medium heat. Spray with olive oil spray and once it's heated, empty tempeh and sauce into the pan.
  5. Let the tempeh cook and the sauce reduce for 3-5 minutes. Turn each piece of tempeh over individually, and let them cook for another 4 minutes or so. After this time, the sauce will become quite thick and may be almost non-existent. It will stick to the tempeh, so stir it gently so as to ensure it's fully covered.
  6. Once browned, your tempeh is ready for devouring!

Monday, June 14, 2010

Sloppy Jays

A quick internet search (okay, maybe I jumped straight to Wikipedia) schooled me on the history of sloppy joes. The Original Sloppy Joe Sandwich was invented at Sloppy Joe's Bar in Key West, and it was actually named for the establishment, not the consistency of the meat. According to the bar/restaurant's website, "It was [Ernest] Hemingway, a favorite patron of Russell's bar from the start, who encouraged [the establishment's] name change to Sloppy Joe's. The new name was adopted from Jose Garcia Rio Havana club selling liquor and iced seafood. Because the floor was always wet with melted ice, his patrons taunted this Spanish Joe with running a sloppy place... and the name stuck."

Elsewhere the sandwich-form sloppy joes are also referred to as:
  • Yip Yips in Southern Illinois near St Louis.
  • Yum Yums in parts of the Midwest USA, particularly in Nebraska
  • Wimpies in parts of the Northeast USA, especially Northeastern Pennsylvania
  • Slushburgers in parts of the Upper Midwest, particularly in Eastern Montana and Western North Dakota
  • Barbecues in other areas of the Upper Midwest, and also in some parts of Southeastern Pennsylvania.
  • Hot Tamales in parts of southeastern Wisconsin, particularly in the Sheboygan area despite the fact that tamales are a completely different food item.
  • Taverns in parts of northwest Iowa and Minnesota.
  • Sloppy Janes in parts of central Minnesota.
  • Steamers in parts of Virginia, West Virginia, and Maryland.
  • Gulash (not to be confused with Goulash) in parts of the Upper Midwest, especially in areas where people of Scandinavian heritage, boasting Viking roots, are prominent.
  • Dynamites in northern Rhode Island.
Not to call anyone out or anything, but Jay ate 4 of these babies, thereby making my name quite suitable. Still, for those Modern Family fans, you will know that this recipe title is not original. It comes from an episode wherein Jay (played by Al Bundy) hosts Jay's night for his grandkids; they all hang out in their p-Jays, eat Sloppy Jays, and watch a western movie. Though there was no cowboy gunfire action in our apartment this evening, I can definitely say that we highly enjoyed these Jays!
The Stuff:
  • 1 to 2 medium-sized sauté pans
  • small mixing bowl
  • largish sauté pan
The Edibles:
  • olive oil non-stick cooking spray
  • 2 garlic cloves, minced (or the equivalent in jarred or powdered garlic)
  • 1/2 (about 1 cup) of a vidalia onion, diced
  • 2 c. frozen multi-colored peppers, defrosted and diced
  • 1 & 1/2 T. dried thyme
  • 1 T. dried oregano
  • about 1 lb. ground sirloin
  • 3/4 c. reduced sodium beef broth
  • 2 T. brown sugar
  • 1 small (6 oz.) can tomato paste
  • 3 T. spicy dijon mustard
  • 1 T. worcheshire sauce
  • 1 T. cider vinegar
  • 1/2 tsp. onion powder
  • 1/2 tsp. garlic powder
  • salt and pepper to taste
The Making:
  1. Spray a medium-sized sauté pan with the nonstick spray and place over medium heat. Dump in the minced garlic. Once the garlic is sizzling, pile the onion and peppers into the pan. Cook for about 5 minutes, stirring frequently, or until the onion is just beginning to lose its color.
  2. You can either do this next step simultaneously or after step 1 in the same pan. Simply move the onions and peppers into a separate bowl to reserve for later. Over medium to high heat, brown the meat in a medium-sized saute pan. If necessary, remove grease.
  3. In a small mixing bowl combine thyme through garlic powder, stirring until combined.
  4. Place the meat and peppers in a large sauté pan over medium-low heat. (A large pan would make it easier, although I was able to finagle my way using the same medium-sized pans.) Pour spiced-up liquid from step 3 into the pan. Stir well. Allow to cook for 5 or so minutes (at least). Add extra broth if your Jays aren't sloppy enough.
  5. Overload the meat on a bun so as to ensure some spillage onto a plate. That's how you know you made them well.

Wednesday, June 9, 2010

Salmon Cakes Mediterranean Style

One of the selling point of making a "cake" of this type is how inexpensive they are to make. For around $4 ($3 if you use tuna, even less if you use beans) you can produce enough cakes to serve four (or two people for two meals, as we ended up doing). On top of that, they can be a welcome change from the usual protein, and they're extremely versitile. In fact, I wavered extensively when I was in the imagining stage of creating this recipe; I was torn between doing a sort of Asian teriyaki-style cake or what I eventually ended up settling on: a cake enhanced with some Mediterranean ingredients. By all means you should use more feta and sun-dried tomatoes than I listed in my edibles list! Unfortunately, I was left scraping the bottom of the jar/container for both ingredients!
The Stuff:
  • 2 medium-sized mixing bowls
  • 1 medium-sized saute pan
The Edibles:
  • 4 crackers, crushed
  • 1 slice whole wheat bread, toasted and pulvarized into bread crumbs
  • 2 T. milled flax seed
  • 1/4 tsp. chili powder
  • 1/2 tsp dried dill
  • 1 tsp. dried parsley
  • 1/4 tsp. onion powder
  • 1/4 tsp. garlic powder
  • 2 T. lemon juice
  • 3 T. mustard (I used a combination of spicy brown and honey dijon)
  • 1 T. miracle whip or mayo
  • 2 T. water
  • 2 large carrots, shredded
  • 2 packets of salmon, equal to 6 oz. of fish, flaked
  • 4 sundried tomatoes, chopped small
  • 1 T. crumbled feta
  • extra virgin olive oil
The Making:
  1. Combine dry ingredients (crackers through garlic powder) in a medium-sized bowl. In a separate, medium-sized bowl stir together wet ingredients (lemon juice through salmon).
  2. Make a well in the dry ingredients and pour in wet ingredients. Using a fork or fingers, mix together. Add sun-dried tomatoes and feta, incorporating these additions into the mixture.
  3. Form the mush into 6 to 7 patties. I recommend making at least 7, because they can be unwieldy when large.
  4. Heat a medium saute pan over medium to low heat. Drizzle with about 1 tablespoon extra virgin olive oil per batch. Once the oil is heated, carefully place 3 to 4 patties in the pan. Cook 5 to 10 minutes per side, or until they have some color and flip easily. The key to knowing when they're done cooking on one side is that they will essentially "self-release" from the pan.
  5. Serve with balsamic or Greek vinaigrette over a bed of quinoa pilaf and spinach.

Friendship Cookies

I decided to call these "Friendship Cookies" for two reasons. First off, my initial purpose in making these little gems was/is to honor the awesomeness of a coworker who is moving on to bigger and better things. In response to my questioning him as to what type of baked good he wanted for our celebration of his new endeavor he replied, "Something full fat, full everything. The works." It was then that I knew that an oatmeal chocolate chip cookie bake-a-thon was in my future.

These cookies are also near-and-dear to the heart of another friend of mine. Jay loves, and I mean loves these cookies. But I should specify: he loves these cookies in this form (not the beefed-up Luke's Cookies style that are amped with protein powder, wheat germ, and other goodies). And sadly, I do have to agree. Not only are these super simple to make (thanks to Paula Dean), but they are awesomely delicious. I couldn't help myself and make them a little (just a teensey-bit) healthier with the addition of flax seed and butter combo, but I swear, you can't tell one bit. These are some hefty cookies that really deliver... and help make sure your friends stick around.
The Stuff:
  • large baking sheet
  • non-stick cooking spray or parchment paper
  • medium mixing bowl
The Edibles:
The Making:
  1. Preheat oven to 375. Prepare a baking sheet by either spraying with non-stick cooking spray or lining it with a piece of parchment paper.
  2. Mix all of the edibles together until well combined. The mixture will be thick, but I was able to mix them rather easily with just a fork.
  3. Spoon by tablespoon onto prepared baking sheet. Bake for 8-11 minutes, or until slightly golden on top.

Saturday, June 5, 2010

Cucumber Salad

This chilled salad would be a perfect accompaniment for a spicy steak or chicken entree. It's simple to throw together and a great way to use up a cucumber before it gets soft. Not only is it healthful, but it's boy-approved! What more can you ask for?
The Edibles:
  • 1 cucumber, thinly sliced
  • 1/4 c. white wine vinegar
  • 1/2 tsp. dried dill
  • 2 tsp. sugar
  • 1 tsp. onion powder
The Making:
  1. Mix together all the edibles. Allow the cucumber to marinade in the refrigerator for at least 30 minutes. Enjoy!

Friday, June 4, 2010

Potato Salad with Peas and Carrots

Moving along with my potato-fancying, I decided to whip together a quick veggified potato salad tonight. This salad is packed full of flavor. From the dijon mustard and coriander, to the broth and cheese, it all melds together to make a creamy summery side dish. If you're not as hasty as I was to get this to the table, you can add one or two diced hard-boiled eggs and celery to make this a real-deal potato salad almost like mom used to make.
The Stuff:
  • medium saucepan
  • medium mixing bowl
  • fork (for mixing!)
The Edibles:
  • 3 baseball-sized russet potatoes
  • 3-4 T. miracle whip or mayonnaise
  • 1 T. honey dijon mustard
  • 1 T. beef broth (or vegetable broth, if you're making it veggie style)
  • 1 T. bacon crumbles (again, omit if you're making it veggie style)
  • 1 carrot, shredded
  • 1/4 c. frozen peas
  • 1 T. Parmesan cheese
  • 1/2 T. dried dill
  • 1/2 T. dried parsley
  • 1/2 T. ground coriander
  • 1 tsp. onion powder
  • 1/2 tsp. garlic powder
  • salt and pepper to taste
The Making:
  1. Boil potatoes until cooked, testing with a fork for done-ness. Drain and immediately immerse in a bowl of ice water.
  2. Combine remaining ingredients in a bowl and serve immediately, or refrigerate in a sealed container.

Thursday, June 3, 2010

Jacket Potatoes

Jacket potatoes were my favorite restaurant entrée when I visited London. Not only are they delicious, but they were often the most economical choice on the menu. Quite simply, they're a loaded baked potato, but instead of the American tradition of chili or bacon and cheese, I chose to recreate an option I commonly went for when I was Britt acting as a Brit: tuna with corn and a sprinkle of cheese. It's like a tuna melt, only with a bit of Irish potato-ness to really warm your heart and your belly.

The Edibles:
  • non-stick olive oil cooking spray
  • tuna salad, about 2 cans-worth (either your own favorite recipe or I provided mine below)
  • several pats of butter (1-2 T.)
  • about 1/2 c. shredded mozzarella cheese
  • optional: balsamic vinaigrette dressing
The Making:
  1. Preheat oven to 450 degrees.
  2. Cook potatoes in microwave until soft (mine took about 4 minutes). Allow to cool for several minutes before handling.
  3. Place potatoes on a piece of aluminum foil sprayed with cooking spray. Crumble the sides of the foil around the potato. This will keep the potato together and make it easier to remove from the pan once cooked.
  4. Cut down the longer length of potato, not all the way through. Cut several times across and push longer sides together to open. Use a fork to break apart potato flesh. Add a pat of butter to the flesh and spread around the inside.
  5. Disperse tuna salad evenly amongst the opened potatoes. Spray potatoes generously with olive oil cooking spray. Top tuna mixture with as much shredded cheese as you like.
  6. Bake in the oven 15 minutes or until the cheese is melted and browning. Drizzle with a bit of balsamic vinaigrette if desired.
Tuna Salad (The Edibles... just mix together):
  • 2 cans albacore tuna, drained and flaked
  • 2-3 T. miracle whip or mayonaise
  • 2 T. honey dijon mustard
  • 1/2 tsp. dried dill
  • 1/2 tsp. dried chives
  • 1 tsp. dried garlic powder
  • 1 tsp. onion powder
  • 1/2 tsp. coriander
  • salt and pepper to taste
  • 1/2 c. frozen corn

Wednesday, June 2, 2010

Watermelon Feta Salad on a Stick

It's officially summer. Despite the negatives that I associate with Chicago in the summertime (such as pressing up against sweaty commuters in a crowded train that smells like B.O.), there are overwhelming positives that make that El ride more bearable. One of my favorite things about summer is the fresh produce. It's the season for berries, tomatoes, and melons, and knowing this I rushed out and purchased my first (and most definitely not my last) watermelon.

This coupling has been on my mind since last summer. I love feta, I love watermelon, so the thought of pairing the two in a salad or something like that sounded simply marvelous. Feeling somewhat lazy and not really willing to make the trek to the grocery store to pick up any additional ingredients, I chose to make a small, simple appetizer that provides all the beauty of this sweet and salty combination. In the meantime, feel free to drool over this salad that inspired all of my desires. Perhaps a copy-cat (with variations, of course) will follow in the near future.
The Stuff:
  • toothpicks (if you're feeling fancy)
The Edibles:
  • watermelon, cut into large chunks
  • fresh spinach
  • crumbled feta
  • balsamic vinaigrette
The Making:
  1. Place one chunk watermelon atop one spinach leaf and top with a pinch of feta. Poke toothpick through spinach leaf, securing the watermelon in the spinach envelope. Drizzle lightly with balsamic vinaigrette. Serve to your most distinguished guests.